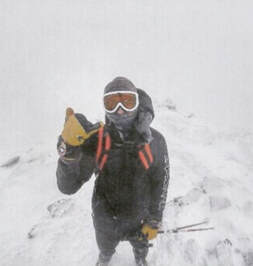
 By Coach Nick Happy Wednesday Everyone! I hope you are all enjoying the beautiful weather and cooler temperatures this week! As the weather begins to shift this time of year we are going to shift our topic of discussion from hot weather to cold weather. Today’s Wilderness Medicine Wednesday post is going to be about hypothermia. As most of you probably know, hypothermia is when the body’s core temperature drops to dangerous levels. Hypothermia is an injury that occurs progressively and has many definitive stages, these stages can range from inconvenient to the patient to fatal. If you spend a lot of time in wilderness settings it is important to understand the risk factors and causes of hypothermia as well as the signs, symptoms, and treatments associated with it. First thing’s first: It does NOT have to be cold, raining, or snowing for someone to get hypothermia. The risk of someone getting hypothermia is ever-present and should never be thrown away, even in the summer. Especially this time of year it is conceivable to hike in the Bridgers (or anywhere) with a starting temperature of 85 degrees and encounter 40 degree temps or lower on the summit. This drop combined with wind chill and moisture from sweat puts us at great risk for hypothermia. No matter what you are doing or what the temperature is outside you should always pack appropriate warming layers that will keep you warm in the worst case scenario you may encounter. For example, if you choose to hike Baldy and it’s 85 degrees at the “M”, you should probably pack the right layers to keep yourself warm at about 40-45 degrees which you may encounter on the Ridge. If you want to do some winter hiking and its 30 degrees at the “M” you should probably pack for 10-15 below, etc. Having the right gear is important, of equal importance is keeping that gear, and yourself, dry. Water is the #1 enemy when it comes to hypothermia so I’ll share a few tips. Always keep your warming layers that you’re not wearing in a dry bag, if you fall into water or it starts raining these need to stay dry. Do you best to sweat as little as possible. Start your hike with the least number of layers on as possible, you should be comfortably cold. As you hike and start to warm up, shed even more layers to avoid sweating. You’ll thank me for this when you get to the summit and the sweat on your body doesn’t make you freezing cold and you have dry layers to put on (side note, in winter hiking it’s possible to get heat injuries due to too much layering). If you haven’t already done so it’s time to ditch any cotton layers you own and invest in merino wool, or synthetic materials. These can potentially save your life as cotton is notoriously slow drying while the others can dry in minutes. Now that we have briefly discussed risk factors and prevention of hypothermia let’s talk about what happens when you or one of your partners in the wilderness becomes hypothermic. As I mentioned, hypothermia occurs when your CORE body temperature drops. The temperature that our body is supposed to operate at is 98.6 (ish) degrees. We are considered hypothermic when our core temp is 97 degrees, yes that’s right, just one degree different. At this temperature our body realizes that something is wrong and enters life-saving mode. The first thing that happens is our body tries to conserve energy and slows brain function. We also begin a process called vasoconstriction, this is when the body restricts blood flow to the skin to create another layer of insulation. Our metabolism will increase, burning more calories produces more heat, just like a fire. These bodily responses will manifest themselves in a few ways: the person will appear “out of it” as their brain function is slowing, their skin (especially their lips) will appear bule or purple, and they may start to appear angry or apathetic. This stage is just the beginning of hypothermia and is not particularly dangerous, we can still operate at this level. However, things begin to go South from here quickly. I won’t spend too much time on the next stages but I’ll just go over the important signs. From 96-90 degrees a dangerous progression will occur as the body gets closer to death. Shivering is the body’s next response to being cold, this is your body’s attempt to warm itself by creating friction within opposing muscle groups. The problem is that shivering burns a lot of energy, which is bad considering our metabolism is already spiked. Next, the body will pull the blood from our extremities to our main organs in an attempt to keep them alive longer. Combined with vasoconstriction this causes us to lose our fine motor skills including speech. While all of this is going on the brain is beginning to shut down and conserve energy. You will see a visible decline in cognition as this is going on. Patients will lose the ability to do simple math and their judgement will be compromised. A lot of patients in these stages won’t even feel cold and will want to continue doing whatever they were doing, obviously don’t let them. Finally, in the last stages of hypothermia the patient will adopt the fetal position and their level of consciousness will be almost unresponsive. At 86 degrees the brain will basically shut off and the patient will appear dead, you won’t even be able to feel a pulse. This part is important: DO NOT PERFORM CPR. Even though the patient appears dead they are not (for a few hours at least). At this stage the heart is beating so slow that it won’t even be detectable on a monitor but it is still going, performing CPR or shocking them with an AED would almost certainly kill them. Patients at this stage are saved by slow warming in a controlled environment and will not be pronounced dead until warmed to a normal temperature. There’s a common rule in medicine that if the brain goes without oxygen for more than 6 minutes it will cause permanent damage/death. This is true in every case except hypothermia, because the body is so cold you can actually survive for a surprising amount of time in this severely hypothermic state. Now that the doom and gloom is over let’s talk quickly about treatment. Luckily hypothermia is pretty easy to treat especially if it’s recognized early. Remember, water is public enemy #1 (on the outside of the body, make sure to keep the patient hydrated). The first thing we need to do is remove any wet clothing the patient has on and get them dry. Next, we need to warm them up however possible. This is best done by creating what we call a hypo-wrap. Think of a hypo wrap as a big burrito of clothes with the patient in the middle. First, lay down something large like a tarp followed by a sleeping pad to keep them off the ground. Then wrap the patient with a space blanket first (if you have one) followed by everything else you have that’s warm. After you get them in the hypo-wrap they need two things: sugar and water. Dissolve any sources of sugar you have into warm water and feed them that way, hypothermia patients can not digest solid food. For severely hypothermic patients we need to take extra precautions not to move them violently (this can stop their heart), and provide rescue breaths to get oxygen to their brain if they stop breathing. Hypothermia is a serious condition but it is easily reversable and recognizable. If you or a member of your party is becoming hypothermic it is crucial to stop whatever you are doing and go home, pushing past these early stages is how people end up on the severe end of this spectrum! I know this was a long post but this is a somewhat complicated topic with many considerations. I will be writing in more detail about this as the winter approaches as well! I hope this post was useful to you guys and maybe taught you a thing or two. I have a pretty extensive background in cold weather environments and would be happy to answer any questions you guys have! Have a great rest of the week and keep crushin’ it in the gym! Thanks for reading!
0 Comments
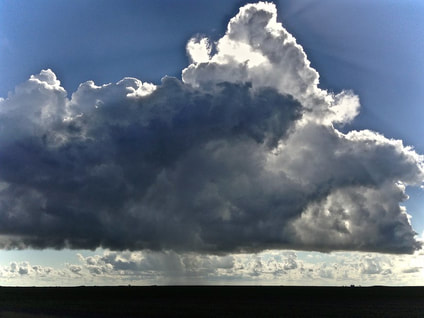 Today's post is about lightning, this is a cumulonimbus cloud, if you see one of these it's time to start taking precautions! by Coach Nick
Happy Wednesday everyone I hope you are all having a great week! Looking at the weather for the weekend and in light of the time of year today’s Wilderness Medicine Wednesday post is going to be about lightning! The focus of this post is going to be on some brief science behind lightning, general safety guidelines/myth busting, and injury treatment. Montana lies in a part of the country with a high frequency of lightning storms as I’m sure most of you know. Most of us like to spend a lot of time outside and lightning can come out of nowhere especially when hiking, it’s always good to be prepared. First, what’s going on with lightning, what is it? Basically, lightning is the earth’s way of balancing itself electrically. Rapid changes in heat and pressure create large clouds called cumulonimbus clouds. These clouds carry two different electrical charges, the top holds a positive charge, the bottom holds a negative charge, and the earth itself holds a positive charge. Inside the cloud there are constant collisions of air, water, and ice that build an electric charge that must be released. In order to do this the cloud releases a negatively charged leader that is met by a positively charged leader from the earth. When these two small currents of energy meet a connection is formed and what we know of as a lightning strike happens. Interestingly, lighting actually travels from the earth, UP into clouds. The lightning heats the air to over 50,000 degrees which creates a pressure differential and a loud boom that we know as thunder. The way that lightning travels is also interesting. Lightning travels over the surface of an object unless there is something within it that’s a conductor. In our case nerves and blood vessels are conductors, which is why lightning strikes are so dangerous to humans. Like most things in life, lightning prefers the path of least resistance. This is why there is some credence to the thought that lightning strikes the highest object around. While this is mostly true it’s important to note that this is not always the case! Taking this forward let’s think of a scenario in which we are exposed to lightning. Let’s say we’re hiking on the ridge in the Bridgers and we see a cumulonimbus cloud approaching. There’s a few things that need to be going through our minds at this point. First, a lightning storm does not have to be directly overhead to be dangerous, there’s a phenomena called blue sky lightning in which lightning can actually strike as far as 15 miles ahead of a storm, we should start taking precautions immediately. The worst places you can be in a lightning storm are mountain peaks, ridges (uh-oh), or near tall trees, cell towers, or any other really tall objects. Also stay away from open fields (where you’re the tallest thing around). It can be tempting to take shelter under natural overhangs or in shallow caves but resist this urge as the lightning can travel into these areas and still harm you. The best thing you can do is come off the ridge back into the treeline and take shelter in a low spot away from as many of the above mentioned objects as possible and sit on some sort of insulator like a foam pad. Put on your rain jacket and get ready to ride out the storm! It’s worth mentioning that if you’re in a group sit away from each other to minimize the possibility of multiple injures from one strike. As the lightning begins to approach you there’s a pretty simple system to determine how far away the storm is. When you see a bolt of lightning count the time between that instance and hearing the thunder then divide it by 5, this will tell you how far away the storm is. For example, if you see lightning then hear the thunder ten seconds later, the storm is 2 miles away. A good rule of thumb is if the time difference is less than 30 seconds the storm is about 6 miles away and you need to take precautions immediately. Before we get into treatment, let’s talk some other guidelines for lightning. If you are on water in a storm you are not safe. It is important to get to shore but even more important to go at least 100 yards inshore as the shoreline is one of the most dangerous places to be. If you’re on fresh water lightning is absorbed into it due to the lack of conduction, however lightning will travel through salt water due to the presence of the sodium. There’s two other ways (other than direct strike) to be struck by lightning called splash and step voltage strikes. After lightning hits it can jump from something like a tree to you, it can also travel over the ground or through water to strike you. That’s why it’s important to shelter somewhere as dry as possible and away from tall objects. Finally, after the storm passes ensure that you wait at least 30 minutes before resuming your activities (again with the blue sky lightning phenomena). I hope this is never the case for any of you but if you, or a member of your group are struck by lightning there’s a few important things to do and remember. First, a person struck by lightning will not hold and electrical charge so do not hesitate to help them. Always remember the D in DRGXABCDE, make sure the scene is safe before treating a patient, be especially watchful for falling trees or newly started fires. The good news of a lightning strike is that 90% of people actually survive direct lightning strikes believe it or not. The most likely injuries you will come across are severe burns, skull fracture (look for fluid coming from the ears or Battles sign which is bruising around the ears) , and disorientation. The moral of the story here is that the patient needs to be evacuated immediately if they are struck by lightning. Do your best to treat any injuries in accordance with DRGXABCDE but you need to focus on getting them to a hospital. Also, lightning can commonly trigger cardiac arrest. If the patient doesn’t have a pulse and is not breathing this is likely what is happening, begin to administer CPR immediately. When evacuation a patient who suffered a lightning strike it is important to assume that their spine was compromised, do your best to immobilize their neck and back on the way out. As we enter a part of the summer where temperatures vary greatly through the day lightning become and ever-present danger. Keep these recommendations in mind as you venture out and you will be prepared (always carry a waterproof jacket!). In mountainous areas lightning storms can come out of nowhere and come and go within 30 minutes. As you are hiking constantly think to yourself where you would go if you were about to get stuck in lightning storm so that you always have a plan! Do not tempt fate, if you see a storm forming don’t go for that summit, turn around and live to fight another day! As always I hope this post was helpful and relevant to you all!  Today's post is about water purification! By Coach Nick
Happy Wednesday everyone! With Coach Leslie back we are going to be splitting some of the blog posts. I have really enjoyed writing the Wilderness Medicine Wednesday post and plan to continue doing so in the future, I hope that you guys like reading this one! In an effort to continue making this post relevant today I am going to write about water purification. It’s very common, especially when camping or going on long hikes to run out of water (accidentally or on purpose due to weight considerations) and need to fill up! I hope that most of you are aware that it’s not safe to just fill your water bottle and immediately start drinking it. If we were to do that we put ourselves at risk of getting sick from harmful bacteria in the water such as E. coli and giardia, or anything else that happens to collect in the rivers, lakes, or puddles that we want to drink from. What’s important to know is that without technology that we definitely wouldn’t carry into the wilderness there’s basically no way to tell if water is dangerous to us or not. If we ingest contaminated water we will almost certainly get sick and exhibit tons of symptoms. The most dangerous and most common are vomiting and diarrhea which cause dehydration and can be fatal if you are far enough in the wilderness. Fortunately for us there are some really easy ways to purify water and virtually guarantee your safety. Today I’ll be talking about these methods, some common products that I recommend, and giving you guys a few tips for travel! The first thing to know is that with water there are basically three things we need to be concerned with: sediment, bacteria and protozoa, and viruses. The size of these “things” goes from bigger to smaller in the order that I wrote them. The reason it is important to know this is because a lot of water treatment methods that you probably know about are not effective in treating all three. Without further ado, let’s get into some popular water treatment methods (in the wilderness) and discuss their pros and cons. The first one that probably came to your mind is boiling your water. This is probably the easiest and most effective method out there. Boiling water will kill all bacteria, protozoa, and viruses that might be in the water. What boiling water will not do however, is remove sediment that’s in your water. After boiling water I highly recommend straining it, you can use something as simple as a clean shirt which will get rid of the sediment. Some considerations for boiling: below 8,000 ft it’s enough to bring the water to a boil to kill bacteria, above that it’s necessary to let the water boil for ab out 10 minutes. An obvious con to boiling is that it requires you to carry a pot, fuel to boil (or make a fire) and it takes time. If you’re out camping or on a long backpacking trip you probably already have this stuff though. Another commonly known method is using iodine to purify water. Like boiling, iodine will kill the microorganisms found in dirty water. It’s important to note that iodine takes time to work. If the water you are pulling from seems relatively clean and is a normal temperature 30 minutes is sufficient for iodine to work. If the water looks really dirty and/or is very cold it takes iodine at least 60 minutes to be effective. Also, straining the water before you treat it with iodine will make it more effective. Iodine doesn’t agree with everyone so I would recommend trying it before your backpacking trip as the iodine makes some people sick itself. The great thing about iodine is that it’s cheap and light weight, it normally comes in a very small bottle or as a bunch of tables that are easy to carry on all types of outdoor adventures. The last two methods I’d like to talk about are filters and UV light. Both of these methods can get a little on the expensive side however they are probably to most effective and safest. There are a TON of different types of water filters you can buy. The important thing to know here is that you need a multi-stage filter for it to be effective in removing sediment, removing bacteria, and removing viruses. When owning a filter make sure that you keep track of its useful life as it will not work after a certain amount of time (most of the time it’s around 5,000 gallons). Make sure that you clean it when you get home, they can easily become plugged and will be almost impossible to use. UV light is typically sold in little pen looking things that you basically just shine into the water. UV light is effective in killing bacteria and protozoa and will kill viruses but it takes a little bit longer for that. These can be a little expensive and require batteries but they are light-weight and work well. In my opinion the best combination of safety and space-saving in the wilderness is filtering your water through a layered filter then treating it with UV light. If you do this it’s virtually impossible to get sick. Check out this article for some of the best options to buy filters and UV lights: https://www.outdoorgearlab.com/topics/camping-and-hiking/best-backpacking-water-filter. Just like anything in life everyone’s situation is different. There’s a myriad of different combinations that could work for you depending on what kind of activity you are doing and how much you want to carry or pack. If you’d like to talk about it further or need any recommendations, I’d be happy to help. A few closing thoughts: When it comes to storing water, you need two SEPARATE containers. One that you collect “dirty” water in and another just for clean water. Use that to purify it with whatever method you are choosing, then dump it into your other container. Make sure they are marked so that you don’t mix them up. There is a myth out there (at least I heard it a lot growing up) that fast-moving water is safe to drink. The short of it is this: no. If you come across really cold, really fast-moving water it is definitely LESS risky thank drinking from a gross swamp puddle but there’s no way to be sure. In a fantasy scenario where you are in a huge emergency and come up to a gross smelly pond that’s right next to a fast-moving beautiful waterfall and you have absolutely no purification equipment, drink from the waterfall you’ll probably be okay. However, the best answer to the question is this: always carry some sort of water purification device and use it no matter where the water is coming from. Have a great week guys I hope this post was useful!  Today's Wilderness Medicine Wednesday post is about heat injuries and the importance of hydration (AND electrolytes) Hello True Spirit Community! Today is Wilderness Medicine Wednesday again! My goal is to make these posts relevant for you guys and primarily talk about common things you may run across in your adventures outside. With that in mind today we are going to be talking about heat injuries. It has been an incredibly hot summer in Montana and all around the country which unfortunately brings with it the increased risk of heat injuries. When I say “heat injury” I am primarily talking about dehydration, heat cramps, heat exhaustion, heat stroke, and hyponatremia. Hopefully all of these things sound familiar to you but if not let’s talk about it!
Hopefully we are all familiar with the importance of hydration as Coach Leslie talks about it quite often! From a fitness and health perspective hydration is the key to looking good, feeling good, and staying healthy. When it comes to outdoor adventures hydration is the key to performing well, and more importantly, staying safe. When it comes to hydration remember that the water we drink today is mostly the water that we use tomorrow. That means that if you are planning a big hike it is important to properly hydrate the day before! Drinking water the morning of a strenuous event is not going to do as much for you because your body still needs to absorb it from your stomach. It is equally important, especially when it’s hot, to consume water at a constant rate during exercise. The American Council on Exercise recommends drinking 7-10 oz water per hour during exercise (this goes up with heat). That means on a six hour hike you need about 60oz of water, or about 1.5L. In my opinion the easiest way to do this is carry a Camelbak so it’s easy to ensure you’re carrying and drinking enough water without having to stop all the time. Hydrating during exercise is ensuring that you are replacing the water you are sweating out as your body attempts to cool itself. The symptoms of dehydration are: headache, nausea, dark urine, and thirst. Typically dehydration is the first step along the road to a more serious heat injury. If you, or someone in your group, starts to experience these symptoms stop and drink a lot of water before you progress into more serious issues. Also, make sure you plan ahead. There are some places in the area with little or no access to water like the Bridgers. Look at a map before you hike, if there is no water access make sure you are carrying enough water, it could save your life. If the area you are hiking does have water access make sure you bring water purification tools so that you can safely drink it, no matter what urban myths you have heard DO NOT drink water in the wilderness without some kind of purification. Moving into heat injuries I am going to cover these in order of severity. It is important to note that these will not always occur in order. It is possible for someone to jump right to heat stroke so don’t think of them as having to come one before the other. First, we have heat cramps. These typically occur with dehydration and electrolyte depletion. Electrolytes are substances that help carry electric currents when dissolved in a solution (like water). Your body uses sodium, potassium, and calcium to carry electric currents sent from your heart and brain throughout your body. When there isn’t enough of these elements in your body (because they’re lost through sweat) your body can’t transmit these currents properly and the first thing that happens is you will cramp because it interferes with your muscle contractions. Because they’re the biggest muscles the first thing to cramp is usually your legs. Heat cramps in their own right are not life threatening but they are a signal that something more serious is occurring. If you see this happening it is important to drink water AND consume electrolytes. This can be done through drinking Gatorade, consuming salt in any form, or eating an orange or banana. Typically these will go away very quickly after consuming an electrolyte. Next up we have heat exhaustion. This is typically seen in people who are not acclimated to hot environments. Again it is not life threatening but it is the last step before we run into really serious problems. Someone experiencing heat exhaustion will complain of feeling very fatigued (pretty self-evident in the name) and they will also begin to develop pretty significant mood changes and maybe even appear dazed or confused. Their skin will talk on a pale, cool, and clammy appearance and their heart and respiratory rates will be very high. Basically, the body knows that something is going wrong because the normal volume of water has decreased and it has to work harder to move the fluids around. If you recognize these symptoms in a wilderness environment (the skin is the easiest one to see) it is important that you get the person to rest in a shady area, remove excess clothing that may trap heart, and make them drink water and consume electrolytes. Remember, electrolytes are just as important to consume as water. Even the worst cases of heat exhaustion should resolve themselves in 6-8 hours if properly treated and it’s key to stop the progression of injury here before we hit heat stroke. Heat stroke is up next and it’s a life-threatening emergency. Typically, people will stop exerting themselves before they hit this point. We need to be especially watchful for it in people doing some kind of competition, or if there are less fit people in a group who feel pressured to keep up. This can also be a common secondary effect in an emergency situation when people are working harder evacuation another patient or pushing to get off a trail before it gets dark. Remember, in emergency situations the worst thing we can do is create another patient. The easiest way to recognize the onset of heat stoke is looking at someone’s skin. The skin will go from being pale and clammy to red, hot, and dry. After extreme fluid loss the body will lose its ability to sweat, therefore losing its ability to cool itself. It’s important to know that at this point someone’s organs are basically cooking and will lose function. Since the body can’t naturally cool itself we need to take aggressive action to cool the patient as there is no other way it will happen. When you see someone with these symptoms their life is in danger. As soon as possible, take off any clothes that are trapping heat and cool them as fast as possible. In a wilderness environment this means getting them into a lake or stream, or dumping water and ice (if you have it) on them. If you need to take the second route make sure you don’t use all the groups water (we don’t need more patients) and use it where it counts. Focus your efforts on their stomach, chest, groin, and head where it will do the most good. If the patient loses consciousness this indicates that the brain got so hot that it shut down, this is a true emergency and requires cool as fast as possible. I won’t get into all of the possible outcomes but here’s what’s important: when someone enters heat stroke they can’t cool down on their own, you have to do it for them, if they lose consciousness this can cause death or permanent damage, any heat stroke at all is an emergency that requires evacuation and medical treatment, do not “treat” the patient and continue hiking no matter how good they say they feel. Last but not least is hyponatremia which is a weird one and a little but counter-intuitive. Hyponatremia happens when the body has too much water and not enough electrolytes. This one is pretty rare but I want to illustrate the importance of a water, electrolyte balance. This is actually a very dangerous condition and can eventually lead to death or coma. The more common symptoms begin with excess urination, nausea, fatigue, and confusion. These are easily reversed by consuming electrolytes. My favorite way to do this in a wilderness setting is by carrying Pedia-Lyte packets. These are extremely light and don’t contain as much sugar as Gatorade. Drinking one of these a day (or more if you’re doing something really crazy) will work wonders in warding off heat injury and hyponatremia. The good news in all of this is that everything I talked about today is preventable! If you plan to venture out and get some hiking in do some quick math to figure out how much water you will need or find a place on a map where you can fill up. Carry some lightweight products that contain a lot of electrolytes (oranges, Gatorade powder, salt sticks etc.) and bring some extras for other members of your group. One thing I like to do is carry an emergency Nalgene in my pack that no one in my group knows about. This is a good thing to have up your sleeve if someone runs out of water, you need it in an emergency, or if you get stuck outside for longer than you were planning. As I say every week, I truly hope that you guys never run into these situations but I hope this post was useful and informative for you! Have a great Wednesday everyone! |
Special EventsRecord your WOD on Beyond the Whiteboard.
Do you need CrossFit or yoga gear? Click on the links below to buy through our GORUCK, Reebok, Rogue or Affiliate share sale programs. These are affiliate links and our gym will be compensated if you make a purchase after clicking on these links.

 Check out our Flickr page!
Categories
All
Archives
April 2024
|
True Spirit CrossFit
 RSS Feed
|

|