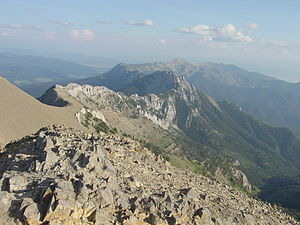
 This week we are talking about map reading and terrain analysis! By Coach Nick It’s Wilderness medicine Wednesday again! This week I am going to be writing about map reading. I know that this does not seem directly related to medicine, but I think this is useful for a lot of reasons. Today will specifically be about contour lines which help us look at a map and understand the terrain that we will be dealing with. Knowing how to understand this can be useful in trip planning, and emergency situations. Primarily, in emergency situations we can look at terrain and make a route for evacuation that avoids dangerous areas and will help us get out of trouble faster. You may be thinking, what are contour lines and where do I find them? Well, they look like this and around found on pretty much any topographical map. 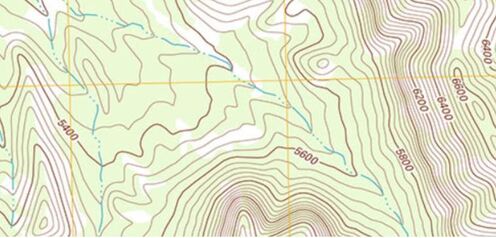 An important thing to look at when it comes to contour lines is the contour interval. This tells you how much elevation change each line represents. The way to find this out is by using two known points, counting how many lines are in between and then dividing the difference. For example, in the picture above we can go to the line that shows 5600ft and count 5 lines between that and 5800 ft. We know that the difference between the 2 points is a total of 200ft, when we divide that by 5 we can see that each line represents a 40ft change in elevation. It’s important to know this scale and what units we are working with because not all maps are the same and it can be very misleading. Now that we know this information let’s talk about what it means to use. When lines are closer together, for example on the East side of the picture above it means that the elevation is changing very fast compared to when they are further apart. By using the elevation we can tell which direction that is going. So, if the were walking East on this map we would be going up in elevation, therefore heading uphill on a very steep grade. Obviously if we were walking West we would be going downhill very quickly. This is important to understand especially if we are carrying a patient or experiencing weather like snow or ice. Let’s talk about recognizing important terrain features just by looking at contour lines. Of course, recognizing mountain summits, fingers, draws, and saddles is extremely important in route planning as they can tell us where to go, or maybe more importantly, where not to go. Rather than type about it I’m going to show you a bunch of pictures of what these look like on a map and in real life. 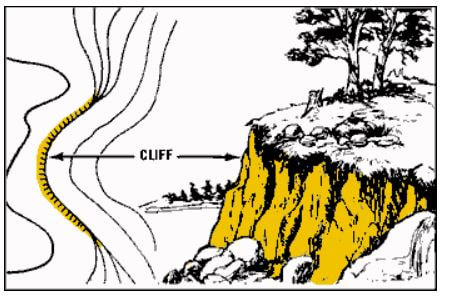 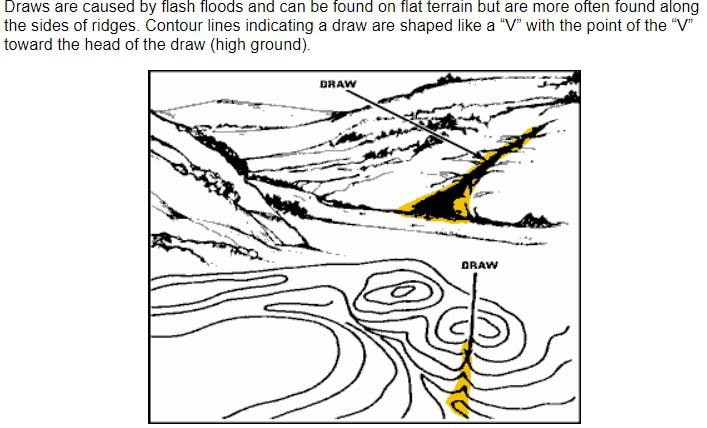 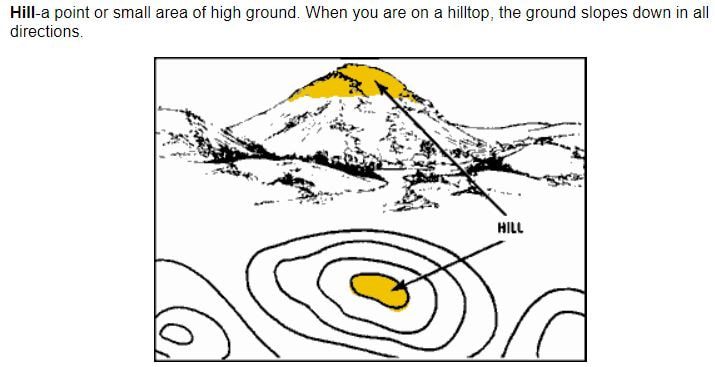 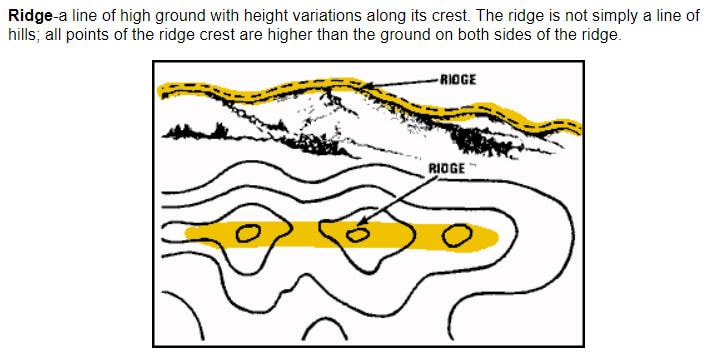 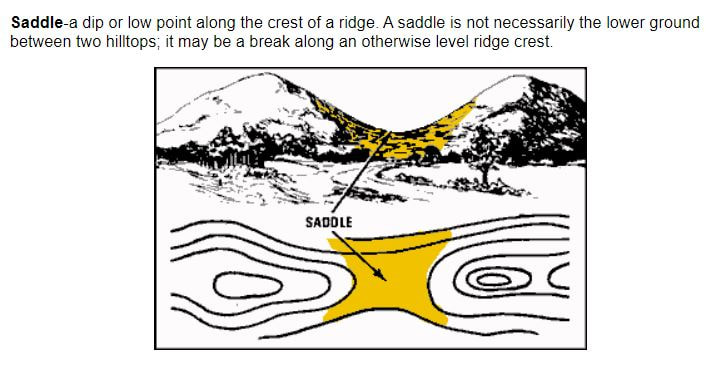 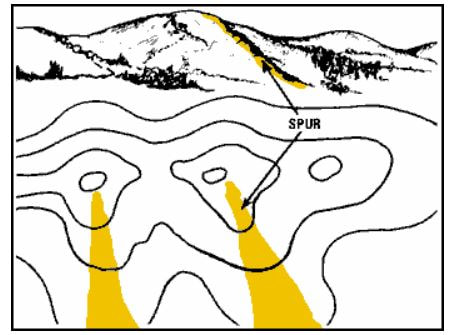 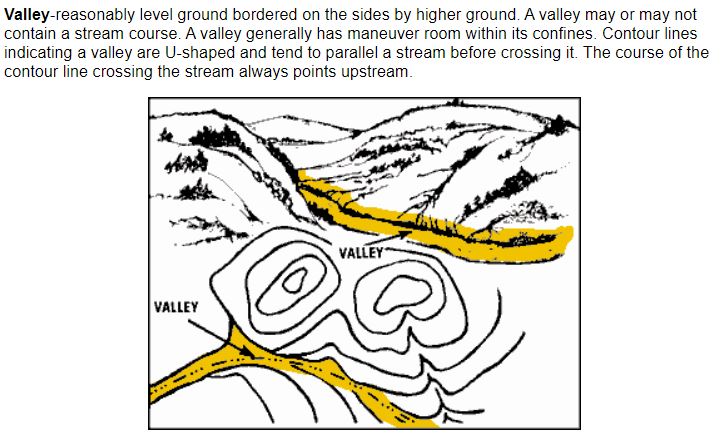 Obviously these are not all of the terrain features you will come across but these are most of the important ones. Remember, even if you are in an emergency the fastest way to get somewhere is not always in a straight line! It is vitally important to take out your map and utilize terrain to your advantage in an emergency situation!
As always I hope this post was useful and interesting to you guys! Thanks for reading and have a great week!
0 Comments
 Today's post is about blisters in the Wilderness! By Coach Nick
Happy Wednesday everyone, it’s time for another installation of Wilderness Medicine Wednesday! Today we are going to be talking about something much lighter and more common than last week’s topic of shock. This post is going to be about blisters which I’m sure all of us have been plagued with at some point. As a reminder today’s post is going to be in the specific context of Wilderness medicine so we are going to approach this from the context of being on a long hiking trip, far away from the car or emergency services. I think it’s always important to start these posts by talking about causes and prevention. Obviously, the ideal circumstance is that we can prevent all of these occurrences and never have to get to the evacuation or treatment steps. A blister occurs when friction causes the layers of your skin to rub against each other. After a while these layers of skin will separate and fluid will fill the gap, giving blisters their raised appearance. Blister prevention is relatively straightforward, eliminate friction. The most important part of prevention is knowing your footwear. The first time you wear a new pair of hiking boots should not be when you decide to hike the Beaten Path over the course of 4 days. When you buy new boots/shoes wear them around the house and do a few short hikes to break them in. If nothing else this will alert you to some friction points that you can tape over in advance of a long hike. The best way to eliminate friction is by wearing two pairs of socks. By this I mean an extremely thin sock (think ankle socks or liners) underneath your normal hiking sock. This simple technique will virtually eliminate all of your issues. I did this during my time in the Marines and never got any blisters. Keeping your feet dry is vitally important. Always carry multiple pairs of socks especially on long hikes, change your socks as soon as your feet get wet, sweat, or at least once a day. These two tips combined will make you never get a blister again, I guarantee it. If you are hiking and start to feel what we call a “hot spot” this is your last chance to prevent a blister. If you have never felt a hot spot before it feels well, hot, and it will hurt a little bit. Basically, you will feel like a blister is forming. All you have to do is put some athletic tape over it and this will stop the progression towards a blister. Hopefully through this paragraph I have conveyed the point that blisters are preventable. If you are prepared and use prevention techniques these do not have to be an issue. Any pictures you see or stories you have heard about blisters covering the entire bottom of someone’s foot or ruining a trip are the result of poor planning or lack of understanding and prevention. With this information I’m confident you can all prevent this from happening to you. Let’s imagine that someone in your trip who does not know this information develops a large blister on their foot in the middle of a long hike and you are not within a day’s walk of the car. There’s a few schools of thought on how to go about treating this, I will give you the thought process and arm you with the information to make your own decision because no situation is the same. Here we are presented with the dilemma of to “pop” or “not to pop” and each has its pros and cons. Let’s start with the “pop” course of action. To pop a blister you need a needle or a knife that is STERILE, you can kind of do this by rubbing it with alcohol and exposing it to flame for a few seconds. From here you make a few holes at the base of the blister, squeeze the fluid out, LEAVE THE SKIN ON, and apply Moleskine. Moleskine is an adhesive, raised band-aid that needs to be part of your first aid kit. To apply this, cut a hole in the middle the size of the blister and place the ring around the blister, fill the middle of the hole with Neosporin, and cover the while thing with a bandage. Popping a blister needs to be a very deliberate decision because we introduce the risk of infection. A blister will not kill you, infection could. Whenever we make a hole in the protective layer of our skin we open the door to infection, especially in dirty environments like the middle of the woods. My recommendation is that a blister should only be popped in the case of an emergency or if the person can not walk at all, otherwise I would recommend just taking the extra time to walk out in a little more pain and discomfort over risking severe infection (this is where we should analyze how far away from “civilization” we are and weight it against the risk). If you decide not to pop the blister you can still use the same dressing technique with Moleskine. As I already alluded to, the patient will be in pain when they step on the blister and will move slow but I would recommend this if you are very far from help and don’t have experience keeping wounds clean. As always, I hope this post was helpful and that you don’t have to experience what I’m writing about. Unfortunately, with blisters we will all encounter them at some point in time. Hopefully this is enough to prepare you to prevent them yourself, teach others about it, and treat them in others. Have a great week everyone!  This week's post if about shock. Some of our Report Ready motivators may have felt like they were in shock after this workout, after reading this article you tell me! By Coach Nick
Happy Wednesday everyone, I hope you all had a great Labor Day Weekend! It’s time for another Wilderness Medicine Wednesday post. Today’s topic is going to be shock, which is a very serious condition that can occur from a variety of different injuries or illnesses. The goal of this post is to give you guys a functional understanding of shock and especially how to see it and begin to treat it. There are different kinds of shock and ways to understand it but I want to keep this post short and useful. The main types of shock that we will encounter are hypovolemic shock, and neurogenic shock. Hypovolemic shock occurs when there is decreased blood volume in the body. This can be caused obviously, by excessive bleeding, but also by a dramatic decrease in the volume of water in the body. Dehydration, vomiting, diarrhea, and thermal burns are what can cause that. Neurogenic shock is caused by injuries to the brain or spine, or allergic reactions. What’s happening in your body when you go into shock? Well, simply put when you go into shock it’s because your body thinks you are dying. If the brain detects a major compromise to your circulatory system it goes into survival mode and pulls your blood from “non-essential” areas to your major organs. This process is called vasoconstriction. While this process keeps blood and oxygen in your brain longer it does not keep you alive and the condition itself can kill you. It is important to be able to recognize shock in patients and act quickly. Patients going into shock will give off some pretty obvious signs and symptoms. First, they will be awake but they will probably appear dazed or “out of it”, they will experience anxiety (the brain thinks you’re dying), and they will have what we call decreasing level of consciousness. They will not be able to answer simple questions, probably not feel the pain that they are in, or ignore really obvious injuries. All of this is the brain’s instinct to protect itself. As a result of this protection instinct the patient’s heart rate will be extremely elevated but feel weak. This is because the heart is working as hard as it can to pump blood to the brain and they are scared/anxious. The most obvious way to spot shock is the patient’s skin which appear pale, cool, and clammy. This is important, if you take nothing else from this post remember pale, cool, and clammy. The reason this sign manifests itself is because the blood is being pulled from extremities to the core of the body which is basically “draining” the skin of color and temperature. If you know how to take blood pressure the patients blood pressure will begin to fall as shock starts to fail. In summary, think shock when you see a patient becoming confused and anxious, their heart rate goes through the roof, and their skin becomes pale, cool, and clammy. If you see someone exhibit these signs and symptoms, it’s important to realize that you are in a life-threatening situation. Your mind should immediately turn to evacuating the patient, keep in mind that at this state they will need to be carried out of the woods they will not be what we call “ambulatory” or mobile. In the meantime, you can do a few things to help them and increase their chances of survival. First, ensure that their airway is clear and open (remember DRGXABCDE). Next, we need to find and treat the underlying causes of the shock. If it’s bleeding, dehydration, allergic reaction, or vomiting/diarrhea we should have some basic ideas how to treat that. Most of the other causes may be outside of our scope to treat such as spinal injuries, if this is the case do your best to stabilize them and get help ASAP. When the patient is not being moved we need to protect them from the environment and keep them in a comfortable position place them in a recovery position. Ideally we would place them on their side (risk of choking on vomit) with their knees close to their chest and one arm under their head to support their neck. Unfortunately at our level of medicine there isn’t much more we can do to treat patients at this stage. However, having a simple understanding of shock, knowing the severity of the situation, and doing some basic treatment can be the difference between life and death. As always, especially in this case, I hope none of you every have to use this information. I’m confident with the information I have provided here that you are all a little more prepared to deal with this and potentially help save the life of someone in your group. I hope you all have a great week and are enjoying some of the nicer weather! 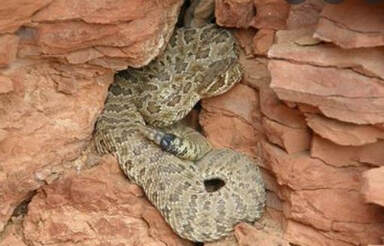 Today's post is about snake bites! by Coach Nick
Happy Wednesday everyone and happy September! It's crazy how fast this summer has gone by, I hope you have all enjoyed it and getting ready for school to start and fall to begin. Today's post is going to be about something that most of us hate: snakes, specifically snake bites. As the night time temperatures start to cool it can be increasingly common to see our least favorite cold-blooded reptiles sunning themselves during the day on our favorite hiking trail. While the presence of rattlesnakes is less common in some areas around here there are also areas that have a lot of them such as Beartrap Canyon. However, most research says that rattlesnakes can live up to 9,500ft in elevation so we should not completely discount them. Today I am going to go over ways to prevent snake bites, how to treat them, and dispel a few common myths, I hope you enjoy and learn something! First and foremost the best way to prevent snake bites is to watch where you are walking or reaching. Most snake bites occur on feet and hands which is the result of people stepping on them or reaching into areas where a snake is living. Contrary to popular belief, rattlesnakes are not aggressive and usually will not just "go after" a person. Bites occur virtually every time as a result of a snake feeling threatened and us invading their space. I hope this goes without saying but don't try to pick them up, you'll get bitten. Practice good bite prevention by knowing when you're in an area with a high snake population (think dry, rocky, sage brushy areas, farms, and near rivers) and pay a little extra attention to where you step or put your hands, especially on the back side of rocks and logs. Luckily our rattlesnake friends have rattles that they will typically use to warn you not to come any closer, I advise heeding that warning. A note about dogs: I highly recommend keeping your dog on a leash or under very tight control when you're in these areas. Most dogs are naturally curious and are much more likely to get bitten. Most bites will be on their nose as they will be sniffing these areas and unfortunately will be fatal due to the restriction of their airways so keep an eye on your dog! As it's impossible to prevent every scenario let's talk about what happens if you get bitten (we are specifically talking about rattlesnakes in Montana here, this is NOT true for all snake bites). If you or a member of your group gets bit the first thing to keep in mind is not to panic. Most snake bites (in the Western U.S) are not fatal as long as you get to a hospital in a reasonable amount of time. The first thing you need to worry about is anaphylactic shock. If this starts to occur it means you're severely allergic to the venom, obviously there's no way to know this until/if you get bitten. This is a serious emergency, if your group has an Epi-pen, use it and evacuate. If not, give the patient Benadryl and get them out of the woods ASAP. Assuming that anaphylaxis does not occur you're more or less in the clear in terms of threat to life. The treatment steps from here are pretty simple: clean and disinfect the wound as if you would any other, bandage it LOOSELY (I'll get into this in a minute) with a wrap, and get the patient out (if they can walk, let them). That's it. Rattlesnake venom is not inherently fatal and the best thing to do is let it run its course through the patient. The best thing to do for the patient is keep them calm, give them tons of water, and get them to the hospital. Continue to monitor them for signs of allergic reaction and be ready to respond to anaphylactic shock. Expect to see them in a lot of pain and potentially running a fever but their life is not usually in jeopardy. Localized swelling is also common, make sure you take off any kind of jewelry they are wearing. For a peek behind the curtain, when they get to the hospital they are not going to be given some kind of anti-venom. The doctors will put them on an IV to help flush the toxin through their system and give them drugs to help manage the pain. Now, time for some myth busting and explanation since come of this may be surprising information. There are two general kinds of snakes un the U.S: pit vipers (rattlesnakes, cottonmouths, and copperheads), and coral snakes. The only ones we need to worry about in MT are rattlesnakes. The venom of NORTH AMERICAN pit vipers is not inherently fatal unless you suffer anaphylaxis. There are some dumb myths out there that you should suck out the venom or apply a tourniquet-like device to the patient: don't do that. Sucking out the venom should be pretty obviously not a good idea (remember my post about creating 2 patients?). The tourniquet is a little more nuanced. Since the venom is not fatal we actually want it to spread around our bodies to "dilute" it if that analogy makes sense. This is why it's okay to let the patient walk out on their own if able because it encourages blood flow. There is one exception to this: if you're bitten by a coral snake (not in MT, mostly Florida and the South) the venom works differently and we want to stop that one from spreading, not the case with rattlesnakes. It's also possible to receive what's called a "dry bite" this is when the snake bites you but does not release any venom. You should still treat these bites the same but if the patient doesn't start to exhibit further symptoms this is probably the case. There's a popular myth out there relating to dry bites and it's that baby snakes are more dangerous than big snakes. The theory is that baby snakes can't control their venom release so you will always be fully envenomated which makes them the most dangerous. While it's true that you are more likely to be envenomated it does not follow that baby snakes are more dangerous. Rattlesnakes have more or less venom based on their size so big snakes carry more venom and are therefore more dangerous if they do decide to release venom when they bite. As I have tried to state many times this advice applies only to snake bites in the continental U.S. If you are traveling make sure to look up local wildlife as some parts of the world have much more deadly snake species. As always I hope none of you every have to use this information but if the need arises I hope this post was helpful. Have a great week everyone! |
Special EventsRecord your WOD on Beyond the Whiteboard.
Do you need CrossFit or yoga gear? Click on the links below to buy through our GORUCK, Reebok, Rogue or Affiliate share sale programs. These are affiliate links and our gym will be compensated if you make a purchase after clicking on these links.

 Check out our Flickr page!
Categories
All
Archives
July 2024
|
True Spirit CrossFit
 RSS Feed
|

|