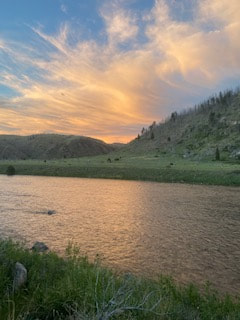
 A beautiful view around sunset in Beartrap Canyon, which is the subject of today's Functional Friday post! Happy Friday everyone! You all crushed it in the gym this week and I hope you have some awesome plans for the weekend! On Fridays I am going to be writing about ways we can use all of the amazing progress we are making in the gym to enjoy the area that we live in. Doing Crossfit not only helps us look and feel great but it allows us to succeed at life. By constantly varying our workouts and incorporating weightlifting, gymnastics, and cardio we condition our bodies to expect the unexpected. This functional fitness prepares us to tackle everyday tasks that some folks find extremely difficult. Lifting kids in and out of the car, chopping firewood, helping a friend move into a new apartment, and climbing a mountain in Montana are activities that are not so different from what we do regularly in the gym. That’s why I will be writing about ways to get out and explore the area that we live that can challenge you and allow you to realize all of the progress you are making!
Today’s post is about a spot just outside of town on the Madison River called Beartrap Canyon. I’m sure that a lot of you have heard of Beartrap before but may not have experienced all that it has to offer. To get there, drive West out of Bozeman on Rt 84 until you arrive at the Madison River. Turn left onto Bear Trap Rd right before the highway crosses the Madison (if you get to the Warm Springs boat launch you’ve gone too far). Once on Bear Trap Rd you’ll turn left onto a dirt road and follow the Madison on your right for about 2 miles until you come to a parking lot and the end of the road. This is a great place to go for a phenomenal hike or trail run if you’re feeling frisky. After parking you’ll follow a pretty developed trail for about .3 miles until you reach a sign that announces you’re entering the Lee Metcalf Wilderness. Wilderness areas are some of the most well preserved and beautiful parts of our country, before entering be sure to research the wilderness area you are going into, they have some pretty specific rules. Beartrap Canyon offers excellent opportunities for hiking, fishing, paddling, and camping. If you go in the summer make sure you bring tons of water as there is not a lot of shade and it gets really hot. I highly recommend spending time in there towards dawn and dusk to maximize your chances of seeing some pretty cool wildlife. Speaking of wildlife, this area is home to a good amount of rattlesnakes. I personally don’t let it stop me from going but it is a good idea to be aware and watch where you step! If you have a dog it is required to keep it on a leash. Follow the link here for a trail map and some cool hiking info for this route (https://www.alltrails.com/trail/us/montana/bear-trap-canyon). You can take this trail all the way from the Madison to Ennis Lake and make it as long or short of a hike as you want. The beauty of this area is that is enough out of the way that there aren’t a lot of people. I have been out there many times and have seen less than 5 other people total! I hope that you guys can find some time to take advantage of this beautiful spot that is so close to where we live! The trail itself is pretty moderate in terms of elevation gain. It’s gets a little steep about 4 miles in but then evens out again. You follow the Madison River the whole time and are never far from a great place to stop and swim! My favorite thing about Montana is the variety of ecosystems in such close proximity. Beartrap is mostly sun baked rocks and sagebrush until you suddenly find yourself in a shaded pine thicket. The variability of this ecosystem is definitely something to experience and cherish. Keep crushing it guys, get out there and reap the benefits of all your hard work in the gym!
0 Comments
 My best friend Brian will be guest writing our Thursday Farm to Food posts! Thursdays posts are going to be focusing on farms and food! My best friend Brian is going to be writing these posts and I couldn't think of anyone better to do it. Brian is an avid outdoorsman who is passionate about our environment, knows a ton about organic farming, and cooks some of the best meals you'll ever eat. Without further ado, Brian's first blog post:
Hello True Spirit community! I’m Brian, I grew up in Maine with coach Nick. I’ll be writing a blog post a week while Leslie is away. When I first arrived at college in Vermont, like many other young people, I had no idea what I wanted to do. I soon realized that I had a passion for the outside. That's when I started studying the Environment with a focus on sustainable agriculture and I became a guide in my school’s wilderness program. This week, in light of all the current environmental issues that are so prevalent, I would like to share some of the benefits that come along with a sustainable agriculture practice known as “cover cropping.” When we think of farming, it's so easy to romanticize both the physical place and the practice: cows roaming in endless spaces, happy healthy employees jovially picking the carrots that get roasted with maple and end up at your dinner table. These scenes do exist, yet the USDA estimates that only 4% of food sales in the United States are organic. Furthermore, organic food production isn't necessarily pretty. Therefore, it is so important to know your farmers and visit the farms that produce food to feed you and your family. By making farm visits, you can ensure that the food you eat isn't contributing to soil and other environmental damages. When farmers grow vegetables, there is a multitude of soil work that needs to be done in order for the crops to have an ideal growing environment. These acts may include tilling, soil amendments, cultivating and ploughing. Many of these actions can be performed in your household garden. On a farm, they are done over and over with heavy machinery. These practices are oftentimes unavoidable for a farm to stay productive- however there are solutions! One solution is called cover cropping. Cover crops are plants that have the potential to increase soil organic matter and fertility, reduce erosion, improve soil structure and diversity, promote water infiltration, and limit pest and disease outbreaks. Along with other practices, cover cropping can be extremely sustainable and beneficial to both the farmer and the land. The benefits of cover cropping are completely dependent on the crop that is chosen. For example, if nitrogen is needed in the soil, it will be beneficial to go with a “nitrogen fixer” like Hairy Vetch. When a farmer discovers a problem with the soil, he/she is confronted with a choice. The farmer could decide to use traditional methods that include harmful chemicals, only to make matters worse in the long run. Or he/she could decide which cover crop might be beneficial to employ. Two of the main families of cover crops are Legumes and Grasses. Legumes tend to be better “nitrogen fixers” and are very good at suppressing weeds. Grasses on the other hand, tend to have a higher amount of carbon which can help promote carbon storage in the soils. Grasses tend to be very carbon-rich plants. They have a great potential to store a lot of carbon and sequester that carbon so it does not remain in the atmosphere. Grasses tend to be more suitable for short term cover cropping as they grow in a very short period of time. Grasses have a high carbon to nitrogen ratio which makes them perfect to use as a means to store carbon. Since grasses have extensive root systems they have a large amount of biomass under the soils. A cover crop that is used with some frequency is Barley. Barley is extremely inexpensive and easy to grow so it is used quite a bit. Another reason that it is often used in our climate, is its ability to grow in cool climates. It can actually grow further north than any other cereal grain. Another benefit of Barley is that it has deep and fibrous roots that sometimes reach more than six-and-a-half feet below the surface of the soil. Cover crops can maintain soil health which allows the farmer to use less harmful practices. These practices also play a big factor in how much carbon is stored. One of the practices is the ploughing and tilling of land. When a farmer ploughs their land, the particulates in the soils start to break up. This is the area that the carbon is stored in and the carbon is released back into the atmosphere. Breaking up these soil aggregates also lessens the soils’ ability to hold water and can kill microorganisms in the soil. Thus, the need for more chemicals and other unsustainable practices- a vicious cycle. Today, as fires rage in the west, floods kill in Germany, heatwaves cover much of the US, and rivers are running dry- we must look to make change. The United Nations estimates that our global food system accounts for one third to 40% of the greenhouse gases that are emitted into our atmosphere (while the transportation sector clocks in at around 17% according to the EPA). We must get creative and make sweeping changes. Buying local, to limit food miles. Using drip irrigation so all of our rivers don't end up like the Colorado River- dry at the delta. Above all else, making conscious decisions with our wallets to support those in the communities we call home who do things the right way. In Bozeman, two of my favorite farms are Gallatin Valley Botanicals (I have a bias because I used to work there- Matt and Jacy are awesome people and Jacy used to be a part of True Spirit) and Amaltheia. Both are family owned and I know first-hand that both families try to do things the right way while truly caring about their food and land. When farmers care about the food they produce and the land that produces it, a healthier environment and a healthier product to nourish us are the results. Right now at Gallatin Valley Botanicals (GVB), they have a bunch of summer squash, beets (my favorite food), fennel, dill and fresh tomatoes. Amaltheia is known for their goat dairy operation as well as their veg and meat production. Try this extremely simple chilled salad from Serious Eats by using the vegetables from GVB and the goat cheese from Amaltheia! 1 pound small yellow summer squash, thinly sliced into rounds on a vegetable slicer 1 small fennel bulb, halved, cored, and thinly sliced lengthwise on a vegetable slicer 2 tablespoons chopped fresh dill 2 tablespoons extra-virgin olive oil, for dressing 2 teaspoons fresh juice from 1 lemon Kosher salt and freshly ground black pepper 3 ounces fresh goat cheese, crumbled In a large bowl, combine squash, fennel, dill, olive oil, and lemon juice and toss to combine. Season with salt and pepper. Add goat cheese, gently toss, and serve right away. (https://www.seriouseats.com/summer-squash-salad-goat-cheese-fennel-dill-recipe) Try roasting the fennel and squash (and beets) to add some nice flavors from browning known as maillard reaction Thanks for reading! Make sure to go check out the farms in the area and feel free to reach out to me via coach Nick to discuss any of this stuff, I love talking about it. Cheers Folks, Brian 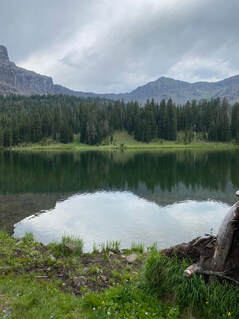 The view at Emerald Lake in the Hyalite Basin. This is 4.3 miles from the road with no cell service. Here we would be in a "Wilderness Medicine" situation. Earlier this Spring, I made the choice to attend a Wilderness First Responder course in Asheville, North Carolina. I figured with the amount of outdoor activities that I enjoy it would be a good idea to have some medical knowledge in case of emergencies. I learned way more than I expected to and had a ton of fun in the process! If you enjoy doing things outside, especially in areas that are not highly trafficked look into taking this course or at least doing these activities with someone who has. For the next few Wednesdays I will be sharing some of the things I learned at the course, especially things that I believe apply to outdoor activities in the area we live. I truly hope that you never have to apply any of this knowledge but if the need arises hopefully I can help you be more prepared!
First, let’s talk about what makes Wilderness Medicine different from what we call “urban medicine”. The military and first responders use a term called the “golden hour” frequently. Basically, from the time an emergency occurs, patients have one hour to get to definitive care (a hospital) before their chances of survival drastically decrease. This statistic is backed by decades of research and statistics from Vietnam through the War of Terror as well as emergency situations in civilian life. We find ourselves in a Wilderness Medicine situation whenever an emergency occurs and the patient can not get to the hospital within an hour. This can happen 50 miles into the backcountry in Yellowstone or a mile up a trail in Hyalite with no cell service. Wilderness Medicine situations can also occur in an urban environment, for example, in a developing country that doesn’t have the same medical infrastructure as the United States. The goals of Wilderness Medicine and Urban medicine are a little bit different as you can probably imagine. If we see an emergency occur on Main St in Bozeman we are probably not going to do much to intervene except call 911 since trained paramedics can arrive on the scene within 5 minutes. If you encounter an emergency at the top of Hyalite Peak there is not more help coming your way anytime soon. In a general sense the goal of Wilderness Medicine is to stabilize a patient (keep them alive) and get them to a place where they can be handed off to a higher echelon of care. There are a few different categories when it comes to the time domains of patient care. First Response deals with the first 5 minutes that you are on scene (this is where most of the difference is made in life/death situations). Emergency Care covers the first hour of care (the golden hour, evacuation ideally happens here)). Extended Care goes into the first 24 hours and Remote Care covers anything longer than that. Today I want to teach you guys a little about the First Response stage. The acronym DRGXABCDE (I remember it as Dr. G X-ABCDE) is probably the most useful acronym that I have ever been taught which means a lot coming from the acronym infested military community. Knowing this acronym by heart is the easiest way to save a life in the wilderness and pretty much anyone can learn it and employ it! So, let’s get into it! D- D stands for Danger. The first thing you need to do when you approach a scene is survey it for danger. Is the patient in danger of more harm i.e a tree is about to fall on the spot the are laying in? Are you in danger, if someone was attacked by a bear is the bear still around? Is your group in danger? Creating more patients is the fastest way to make a situation worse. Before you rush to help a patient it’s crucial to make sure you won’t be making things worse. R- R is for responsiveness. Here you need to assess the level of consciousness of the patient. Here you’re looking at the basic level of are they responsive or unresponsive? If they are responding this is where you need to get their consent to treat them. If they are unresponsive you normally have what’s called “implied consent” which means you can treat them within your level of training. G- G is for general impression. In this step you are deciding how bad the situation is, is this a life- threatening situation or not? The first 3 steps (DR.G) are called the scene survey. The goal here is to not get tunnel vision on the patient and survey the entire scene before you dive into treating any of their problems. This whole phase should take about 30 seconds to 2 minutes. (the following XABCDE sequence is meant to be followed in order, you will see why as I explain them) X- X is for Extreme Bleeding. The most immediate threat to life is extreme bleeding. Arterial bleeds can cause death in less than 2 minutes. Without getting too in depth here the name of the game is to put as much pressure as possible on extreme bleeds and try to cut off circulation to that part of the body if it’s a limb (torniquet). The way to tell an extreme bleed is if a wound is spraying bright red blood, this indicates an arterial bleed and needs to be dealt with ASAP. A- A stands for Airway. The next thing to check is if the patient has an open airway. The easiest way to do this is through the head tilt/chin life. When the patient is lying down on their back you put one hand under their chin, another on their forehead, and tilt their chin up towards the sky. This is an incredibly effective method to open an airway and will work most of the time. The most common obstruction to an airway is the patient’s tongue, followed by foreign objects. This method will help you deal with both of those problems. B- B stands for breathing. After opening the airway the next thing to check is if the patient is breathing. If not, and they are unconscious and not breathing CPR is the necessary step here. After 6 minutes of the brain not getting oxygen we start to develop brain damage so the goal is to get oxygen to the patient’s brain via CPR or unclogging their airway within that time limit. C- C is for circulation. This is where we check if the patient has a pulse or any bleeding other than arterial bleeding which we may have already dealt with in the “X” step above. The goal here is to stop any other bleeding and identify where a patient may have lost circulation in certain areas which is indicated by a lack of pulse. D- D stands for disability. Here we are looking at the patient’s spine. If the patient is exhibiting severe head trauma or the way they were injured indicated possible spinal damage we want to stabilize their neck and back. Some injuries that could give you this clue are falls from any kind of height, patient complaining of neck/back pain, or obvious head trauma. The goal is to use anything you have on hand to make a collar that stops their neck from moving and a board that stabilizes their spine. E- E is for environment. We do not want the environment to create any more problems for the patient, injured people are more susceptible to environmental conditions (dry/wet/hot/cold). The easiest way to think of this step is you want to counteract the environmental condition you are in. If it’s cold, warm them up. If it’s raining, help them stay dry etc. It may not seem like it but knowing this acronym is an incredibly effective way to save a life in any emergency. I tried to explain this in a basic way but honestly, there isn't a ton more to know in these steps to save a life in most situations. The sequential nature of the acronym helps us to identify and treat the most life-threating problems in the correct order so it’s important to remember it this way. For a lot of us, the reason we do Crossfit is to be able to live more functional lives. This generally translates to spending more time outdoors hiking, skiing, fishing, hunting, or anything else we enjoy in nature. These activities are incredibly important to maintain our mental and physical health but some of them come with inherent risks to ourselves or others. Instead of being fearful of the risk we can prepare for it and go outside with the knowledge that we can deal with anything that could be thrown our way! I hope this blog, and future Wednesday blogs, helps you all feel more prepared. At the same time I sincerely hope that none of you ever have to actually use this information but it can’t hurt to know! 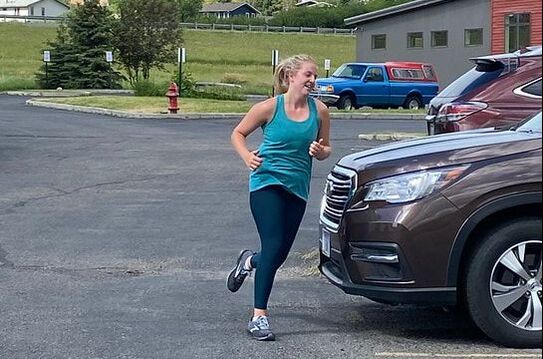 Hope rounding the corner during one of our running WODs. The IT bands are crucial in helping us run. Hey everyone, happy Tuesday! During my stint writing this blog I will be focusing on various tips for better performance in the gym. Of course, the point of Crossfit is the transfer into our everyday lives so I will discuss how to see these improvements in our everyday lives as well!
Today we will be talking about our IT bands, in my opinion these are the most neglected part of our bodies but contribute the most to helping our performance and preventing injury. If you come to my 9am and noon classes you are probably starting to get familiar with the painful exercise of rolling out our IT bands at the beginning of our class. But, don’t fear! This pain is short lived and this stretch will no longer hurt after just a week or two! So you may be wondering what is an IT band and where is it? To begin, your IT band is a large piece of fascia that runs on the outside of your thigh from just above your hip to just below your knee. Fascia is an elastic tissue found in the body that works like your tendons. Fascia primarily surrounds your muscles and connects them to your bones, the IT bands are actually the largest piece of fascia in your body. Cool, so what do they do? Imagine that your IT band is a giant rubber band that goes down the side of your leg. When you are running the band stretches are your leg goes back and the elastic energy propels your leg forward, aiding in the movement and saving you energy. Basically, the elastic energy in your IT band aids you in any movement that involves flexion and extension of your legs. A team of scientists at Harvard discovered that the human IT band can store 15-20 times more elastic energy than that of chimps and its energy storage potential is greater in running than walking. So, the harder you are using it the more it will help you. The IT band is tricky in that you don’t notice it too much when it’s loose and everything is working properly but it becomes a significant bother when things aren’t going right. When your IT bands are too tight you develop what’s called IT band syndrome. As your IT band tightens it becomes inflamed and can rub against your femur or the outside of your knee. As you can probably imagine as the “rubber band” tightens it pulls things like you knees, hips, and lower back out of alignment and can cause significant pain there too. There are many different things that can cause IT band syndrome but the good news is that the way to fix it isn’t too difficult! The recipe for success here is rest and stretching. As with anything the best treatment is prevention which is today’s tip for performance. Regularly stretch or foam roll your IT bands. If doing this hurts it is a good sign that your IT bands are too tight and need a little more attention. I know that a lot of you love to get outside and run or hike which is one of the best things about this beautiful place we live. To continue doing this pain free and get the most enjoyment out of it as possible pay a little more attention to those IT bands and keep getting out there and having fun! See you all in class this week and come in ready to do some foam rolling! Below are a couple of the links I used to help write this post and others that could be useful to you in learning more and finding some good stretches. https://www.athletico.com/2012/06/05/it-band-syndrome-the-top-5-causes-and-solutions/ https://news.harvard.edu/gazette/story/2015/08/understanding-the-it-band/ https://www.prevention.com/fitness/workouts/g26098571/it-band-stretches/ https://blog.nasm.org/fitness/5-go-corrective-exercises-iliotibial-band-syndrome |
Special EventsRecord your WOD on Beyond the Whiteboard.
Do you need CrossFit or yoga gear? Click on the links below to buy through our GORUCK, Reebok, Rogue or Affiliate share sale programs. These are affiliate links and our gym will be compensated if you make a purchase after clicking on these links.

 Check out our Flickr page!
Categories
All
Archives
April 2024
|
True Spirit CrossFit
 RSS Feed
|

|